Search This Blog

Showing posts with label Orly. Show all posts

Friday, 18 April 2014

Pastel Sponge

Day 2 of the challenge brings us to the prompt "pastels". I grabbed a whole bunch of pastel shades and just started painting!


I did 2-coats of the following:

Zoya Gie Gie (pink) on my thumb, Zoya Blu on my index, Sally Hansen Xtreme Wear Mellow Yellow on my middle, Sally Hansen Xtreme Wear Mint Sorbet (green) on my ring and Sally Hansen Xtreme Wear Lacey Lilac on my pinkie.

Once the base coats were dry, I sponged on all the colours over all my nails to give a muted watercolour kind of effect.


I then did a coat of Orly Goin' To the Chapel to give it a kind of pearly effect. I don't know that the pearly effect really came across in the photos but it really looked beautiful. I should have taken a picture in the sun (if only there were sun this time of year, lol!)


Then I chose an image from on of my MoYou plates and stamped it on my pinkie, ring and thumb. I added a couple rhinestones to the remaining two fingers and ended up with something I think is really pretty. I got lots of compliments on these at work.

Haven't started tomorrow's look yet, yikes!

Happy painting friends!

Wednesday, 12 February 2014

Roses-Valentine's Week Challenge

This was possibly my favourite prompt! I knew right away what I wanted to do and couldn't wait to get started on it. It took me awhile to choose my base but I absolutely love how these came out and I think they would be appropriate year round!

Day 3- Roses

I decided that I was going to do something fairly simple but elegant and what says elegant but a French manicure?


I started with a base of three coats of Zoya Jacqueline (cream) and then painted one coat of Orly Goin' to the Chapel over it which gave it a really pretty soft pearlescent look.


I then went in with deborah lippmann Run, run Rudolph (which is technically a Christmas shade I guess) and blobbed on the rose shapes. I love love love this red!


I added in the rose details with a black nail pen and then the leaves are made from piCture pOlish Jealousy. I added Glisten and Glow Top Coat, a bit of bling (rhinestone stickers I got from Michael's) and then called it a day.


I'm in "love"! It turned out exactly how I was hoping, simple and elegant.

Tomorrow's prompt is Hearts and as I write this I haven't completed my look yet. I need some inspiration!!

Happy painting friends!


Monday, 10 February 2014

Candy Hearts- Valentine's Week Challenge

I'm participating in a week long challenge involving Valentine's nail art. This is the first ever challenge I've ever taken on and I'm excited! I've wanted to do one for awhile and the thirty day one seems a little daunting so I was super pumped to see Jessica over at Be Happy and Buy Polish start a challenge centered around love.

Day 1- Candy Heart Sayings

I must say that I struggled a bit with this one. I wasn't really sure how to interpret it and my mom started suggesting some different ideas and I went with the "Bee Mine" one she came up with.


I really like how this turned out. I think it looks very cute and feminine. I started with a base of Orly Cotton Candy and then did a gradient with that and Orly Pink Chocolate (don't you love that name!). The hearts, writing and bee were done with nail pens.

Orly Pink Chocolate


I thought we were being really original until I googled some images and realized that people had done things like this before. I'd already finished my design though and liked it so much that I didn't have the "heart" to take it off, lol.

I guess I'll just have to put my thinking cap on and try to "bee" more original next time. Ok, no more puns ;)

Happy painting friends!

Wednesday, 11 December 2013

A Little Bit Holly

Being back at work has sure made me behind in blogging! I have definitely not been on top of it like I usually am but I still haven't missed a day! I wanted to do some nail art for my friend Holly and what better to do than some holly :)


I started with a base of Orly Moonlit Madness (red) and then did a diagonal stripe of Zoya Tomoko (gold). I then took the Orly and dotted on the berries followed by putting the leaves and gold accents on with nail pens.


I really like how these turned out but they weren't what I pictured in my mind lol. Isn't that always the way?


Apparently I applied the top coat (Seche Vite) rather poorly as I had uneven lines near the cuticle. Oh well, it's a learning process!

Happy painting friends!

Tuesday, 10 December 2013

In a Galaxy Far Far Away...Called Vernon!

I'm going to take a break from the Christmas designs I've been doing to show you the last nail art I did for my friend Carrie when I was visiting her in Vernon. I love the galaxy design and since she is a scientist (biology not astronomy though) I thought I would do it for her.


She guessed what is was right away which made me very happy :)


I started with a base of Sally Hansen Black Out and then sponged on a load of colours mostly from Orly and Essie.


I then went in with one of my nail pens and drew in little stars. The best thing is that as I am typing this I have Songza on and the Imperial March from Star Wars has come on. So perfect!

The galaxy mani is really quite easy to do. You just need to layer colours with a sponge. I usually start with dark and go lighter to build up the colour.

Thanks Carrie for the use of your nails :)

Happy painting friends!

Sunday, 8 December 2013

More Snowflakes but so Tiny!

Today is day two of my nail art featuring my friend Carrie and her daughter. Today is focused specifically on her daugher Mina. She is five years old, cute as a button and very smart! I had such a good time visiting with her and doing her nails. She loves pink (of course) but is also really drawn to bright orange! She wanted snowflakes just like her mom so I had to give her what she wanted :)


I started with a base of Orly Mayhem Mentality and then drew on the snowflakes with a silver nail pen. The glitter accent nail is by Color Club.


The thing I love the most about this is she chose everything herself. All the colours, where the accent finger was, everything! She had very definite opinions of what she wanted.

She was very happy with the result:


How cute is she?!?

I then invited her to do my nails and she was very excited to choose my colours and design. She was even brave and tried using the nail art pens!


Needless to say there was a lot of glitter involved! She was so invested in doing my nails and I loved it. There were a lot of colours involved and I won't list them all here but I will say that the end result reminded me of a birthday party so we called them "birthday nails".

Thanks Mina!

Happy painting friends!

Thursday, 5 December 2013

These are a Few of My Favourite Things

I thought I would do a post focused on the things I'm really digging at the moment. I've been blogging for a little less than three months now and I feel like I've learned a ton about nail art and polish. Some of my friends were asking me about what polishes I like and wanted me to do a post on it. Ask and ye shall receive!

Here are my favourite nail polishes/brands:

1. Sally Hansen

I think that Sally Hansen Xtreme Wear is the best polish at a lower price point (you can get it for less than $2 a bottle at Target in Canada). It usually only takes 2 coats to get even coverage and comes in a variety of really beautiful shades. If you want to get some polish, but don't want to invest a lot of money, this is your best bet.


2. China Glaze

China Glaze is also a great polish for a reasonable price. I usually buy mine at Winners and you can get it for around $5-$6 a bottle. Again, they have great colours and I find the formula really great to work with.


3. Zoya

If you've been reading my blog for the last little bit, you know how absolutely over the moon I am about Zoya. Unfortunately at the time of writing this I only have six polishes! I can't wait to get more but the ones I have are absolutely wonderful. The colours are stunning and they all apply like an absolute dream.. I can't say enough about these polishes!
You can only buy these online or in select salons. I don't know of any salons in my local area so I have to get them online (Nail Polish Canada) but you can search for local distributors on zoya.com.


4. Orly

Orly is another polish that I seek out at Winners. I like to get the mini bottles and you can usually get 5 for $10 there. Most of the polishes I have from this are wonderful. Some of them can be a bit on the thinner side so you'd have to layer them a bit more (3-4 coats) but generally I find them great.


5. Essie

Essie is one of the first brands that I really got hooked on. I have quite a few of them and have bought the majority of them at Winners. They retail in regular drugstores (around my parts) for close to $10 but I have found them in the States in Walmart for $7. The colours are generally very pigmented and go on nicely.. I love working with these polishes!


So these are my favourites at the mo'. I have many different brands of polish but these are the ones I find myself reaching for again and again.

I hope this helped. If you ever have any questions about a polish or a brand I use, please feel free to drop me a line!

Happy painting friends!

Wednesday, 4 December 2013

I'm Obsessed with Snow!

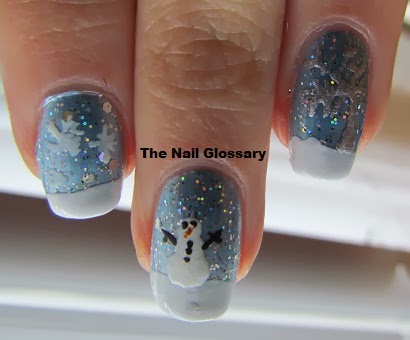
I know I've already posted two (maybe three) snow designs so far but what can I say? I love me some snow! I started with a base of Kleancolor Blue Pearl, a silver glitter topper and Orly White Out (for the snow on the ground). I then did the rest of the design with nail pens.


There is something about blue and silver that just says beautiful to me. I love it paired together with a snow motif.


It reminds me of a snow globe being shaken.


I am so in love with this design I can't even stand it! It makes me so happy :)

I'm really really enjoying doing this winter/Christmas themed nail art. Stay tuned for more!

Happy painting friends!

Tuesday, 3 December 2013

Rocking Around the Christmas Tree

I think that we are going to get our Christmas tree this weekend which I am beyond excited for! We usually go to Ikea of all places but they have nice trees and we usually get some chocolate biscuits from their food section and then fight (not really!) over which Christmas music to play. It's our own little tradition :)


I started with a base of Orly White Out (2 coats) and then put two coats of a silver glitter on my pinkie and thumb. 


Then I went in with my trusty nail pens and drew on the ornaments and tree. I added a silver star to the top of the tree and called it a day.


I really like the cleanness of this design. It's not too busy.

Now bring on the chocolate biscuits and tree trimming!

Happy painting friends!

Saturday, 16 November 2013

Coordinating Accessories!

I was looking at my iPhone case the other day and thought that it would make some great nail art. It's a black case with white polka dots and has a border of pink. I think the nails have a very cool '80s vibe about them.


I started off with a base of just a basic Revlon black and then added the polka dots using a medium dotting tool and Orly White Out.


I then used one of my bright pink nail pens to draw in the pink area. Here is a pic with my phone:


I love this look but I don't know that I would want my nails to match my phone all the time! I don't want to be "that" girl. I'd be curious to try it in other colours though.

Happy painting friends!

Tuesday, 12 November 2013

The Answer My Friend...

When I used the Orly Mash Up Collection the other day for my mother in law's birthday nail art I really wanted to use it again for something else. I love the colours; they are so bright and amazing. I decided to use two of them Orly Pretty Ugly and Orly Harmonious Mess. I painted them on and decided to do some flowers. I'm not really sure how they turned into dandelion fluffs but here we are :)


When I finished this mani I thought, "Wow, it would be great for spring!" It's probably not appropriate for November but I don't really care. It's bright and happy and that makes me feel good! Who says you need to stick to the seasons in nail art?


I could have benefited from a bit of moisturizer around my cuticles as they are looking mighty dry in some of the pictures!

I hope this gave you a breath of the spring.

Happy painting friends!

Friday, 8 November 2013

Nimbus

I get a lot of my ideas from other bloggers and always try to give credit where credit is due. This one comes from one of my favourite bloggers The Nailasaurus. She comes up with great ideas all the time and I can only hope to have work that is as clean as hers one day. This is a technique she calls Nimbus and is done using a cotton swab, acetone and polish. There is a great tutorial on her website here.


I started with a base coat of Orly White Out and then used the Nailasaurus' technique to dab on my other colours which were Barry M Greenberry, Color Club Wild Cactus (dark green), and Color Club Sugar Sheer (pink).


I really love this look and I think it's something that is easy to do on both hands. The other great thing about this is that it lends itself to so many different colour palettes. I'll probably try it in warmer shades soon.


I still need to figure out my camera skills because the colours were a lot more saturated in real life.

Hope you've enjoyed :)

Happy painting friends!

Monday, 4 November 2013

It's a Mickey Birthday Party!

Today is my dear mother-in-law's 60th birthday! I wanted to celebrate by doing some nail art for her since I can't be physically with her (for those of you who don't know she lives in England). When I think of my mother-in-law I think of bright happy colours and Disney, lol. My husband's family, like me, are Disney fanatics so I really wanted to incorporate the Mouse into the design.


Here's my Mickey Mouse birthday party nail art. On each nail there is a different base colour (listed later in the post), some polka dots, Mickey heads (some with birthday hats), and then random other dots and streamers.


I think this design is really fun and pretty much what I was going for. My mother-in-law is an extremely vibrant person and that is reflected in the design.


I hope she enjoys the design and has a fantastic birthday!

I used one coat of Sally Hansen White On for all my fingers (to make the next colour pop) and then painted on the colours as follows to form the base:

Thumb=Joe Fresh Lime Juice (green)
Index=Orly Mayhem Mentality (orange)
Middle=Orly Harmonious Mess (purple)
Ring=Orly Choreographed Chaos (pink)
Pinkie=Orly Pretty Ugly (blue)

(Mickey heads, birthday hats, dots and streamers were done with nail pens)

Happy painting friends!

Sunday, 3 November 2013

Waterfall

There was a really cool nail design on The Nailasaurus which she called a Waterfall. I've done it before but I thought I'd do it for my blog. This is a reasonably simple look but is very pretty.


I started with a base of Orly Gilded Coral which is a beautiful light pink with a subtle shimmer to it. I then went in with a whole load of metallic nail art pens from Color Club. The Nailasaurus uses a nail art brush in her tutorial but the nail pens from Color Club have a very thin brush which is perfect as it provides the same effect.


The great thing about this look is that you can do it in so many colours and it's a relatively easy one to do on both hands.

Happy painting friends!