Search This Blog

Showing posts with label L'Oreal. Show all posts

Saturday, 12 April 2014

Tea With Kaycie

I love to do my friend Kaycie's nails and today's are no exception. These ones are featuring my new MoYou Nail Stamping Plates which my dear mother in law got me for Christmas. Kaycie chose these cute teapots and teacups from the traveler collection.


I started with a base of L'Oreal Sweet Chiffon and then stamped on the teapots and teacups with Sally Hansen White On.


 I always like a bit of bling so I added on some accent rhinestones and put a shimmery topcoat (sorry don't remember which one) on a few of the nails.

I must say that I am IN LOVE with my MoYou Nail Plates! I use them all time. You can check out a lot more of my designs on my Instagram account; just search for @thenailglossary and you can see my daily looks.

Happy painting friends!

Monday, 18 November 2013

Let the Snow Fly!

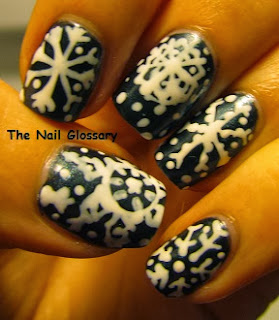
My hubby is getting extremely excited for the upcoming ski season (in fact Whistler had limited opening for skiing on Saturday and he was tempted to go!). He keeps checking the weather forecast to see if it's snowing on the mountains so I thought I would do some snowflake nail art to inspire the snow to fall.

I have never done snowflakes as I really only started doing nail art seriously this past summer so I wanted to try a different style of snowflake on each nail.


The base of this design is a dark smoky blue from L'Oreal called VIP Status. It has a beautiful silver shimmer undertone and it reminded me of a cold wintry night.


The snowflakes are done with just a basic white nail pen. I think that it would have worked well with a silver nail pen as well.


I took these photos at night so they are under artificial light. Not my favourite lighting but I had to work with what I had! Now that I'm a bit more mobile I'm going to be experimenting with my photos and lighting a bit more to find a good balance.

Here is each nail individually:


I think my least favourite is the middle finger; it's a bit messy for my taste. My favourite is probably the pinkie. I like how that one turned out.

Let it snow, let it snow, let it snow!

Happy painting friends!

Sunday, 17 November 2013

Studly

Today is a bit of a mash up of two different designs. I like the idea of putting different designs on nails; not having all the nails the same. I am going to play around with it more in the future but here is one I'm pretty happy with.


I wanted to mix something a bit harder (the studs) with something a bit softer (the nimbus design). I started off painting my index finger and middle finger with Jessica Brown Sugar. I painted the other ones with L'Oreal So Chic! (which is a very pretty neutral with a shimmer).


I then went in with some square studs I got off eBay and placed them with a wax pencil (I also got from eBay) on my index and middle fingers.


I then did the nimbus look (follow the link for a tutorial) using Natural Collections Frosted Plum, Lunar Haze and Black Cherry. I also added a light green by Miss Sporty. I topped it all off with a coat of Seche Vite.


I am going to have to do more of this type of art because I really love the effect it gives. What do you think? Something you'd try?

My little dog just got her haircut so I thought I'd add a pic of her. Isn't she so so cute?


Happy painting friends!

Friday, 15 November 2013

Tape it Off Baby! (tutorial)

It's time for a tutorial! I know it's been a long time since I've done one so I apologize for that but I've got a killer look for you today and all it requires is nail polish, scotch tape and patience!

Here is the finished look:


For this look I used Vernis classique by Cherimoya Light Red and two coats of L'Oreal Satin Sheets to get a kind of rose gold colour for the base.


I then taped off random sections and painted on L'Oreal Boozy Brunch (orange), Sephora X Control Freak (maroon) and OPI  Magazine Cover Mouse (textured red).


Here is a step by step breakdown of how I achieved the look:


Step 1: after prepping your nail (I usually use a cuticle oil and then a base coat) paint on your first colour. In this example I am using Essie Good as Gold. Then comes the hardest part; you need to wait for it to dry really well! If you go on to the next part to soon, you will pull up your base coat and will need to start again.

Step 2: using scotch tape, section off a part of your nail. Make sure the tape is really stuck down so you don't get bleeding under the tape.

Step 3: use your second colour (I used China Glaze Turned up Turquoise) and paint over your nail. No need to paint in the lines as that is what the tape is for.


Step 4: remove the scotch tape. As you can see I was a little eager and applied the tape too soon and got some damage on the tip. If I was doing this for real I would have redone it but I'm glad I can show you and you can learn from my mistake, lol.

Step 5: the same as Step 2. It's so important to make sure your polish is fully dry before you apply the tape. If you want to speed the process up, you can add a fast drying topcoat before putting the tape on.

Step 6: paint on your next colour.


Steps 7-9: repeating steps 4-6 (I used a green glitter from Color Club for my last colour).


Once you've finished all your sections you can top it off with a top coat and Blam! you have some beautiful and easy nail art. The most important part is just being patient and allowing your polish to dry before going on to the next step.

As you can see from my first pics, no two nails are the same. It's a really versatile design so just have fun with it!


Happy painting friends!

Thursday, 14 November 2013

Fit For a Princess

I wanted to do something very girly and I think I hit the nail on the head with this one! I think I'm a bit old to wear this look, lol, but I think it would be so cute for a little princess.


I started with two coats of OPI Pinking of You and then added a layer of L'Oreal Satin Sheets to give it a beautiful shimmer.


I then taped off sections for each colour I used starting with a pink metallic from Vernis classique. Then I used a pink/silver glitter from Color Club and then Good as Gold from Essie for the central triangle.


I topped it off with a light pink jewel and voila! I think they look like little tiaras. So adorable!!

Happy painting friends!