Search This Blog

Showing posts with label blue. Show all posts

Monday, 12 May 2014

MoYou London Stamping Challenge: OOTD

I guess I'm not down with the kids because I had to google what OOTD meant. Apparently it means Outfit of the Day, lol. I bought this cute new dress from Tommy and thought it would be great to pair with one of my fun necklaces.


I started with a base of Zoya Purity on my thumb and ring finger and an unnamed Color Club on my other three fingers. I then used the Purity to stamp on the flowers using MoYou Pro Plate 06. The stripes were added using a blue striping brush.


I added some rhinestones to the centre of the flowers and an HK Girl Glisten and Glow top coat to make it super shiny.

I am so happy with how this turned out! I think it matches the outfit and necklace perfectly and looks so pretty. In love!

Happy painting friends!

Monday, 5 May 2014

MoYou London Stamping Challenge: London

I bought the London version of MoYou's Tourist Collection (plate 05) for a few reasons. 1) My husband is from England 2) I lived in England for three years 3) it's super cool!

Boy did it come in handy for today's look!! The prompt was London for today's stamping challenge and of course I had to use this plate!


I really dig how this turned out but holy cow was it a struggle! I redid the red finger about five times. It started as a London bus (but my finger wasn't big enough), then it was "keep calm and carry on" (but I kept smushing the words too much and after three attempts I had enough) and finally I chose the Tube map. I liked how the routes extended onto my finger so I didn't clean that part up.

I wanted to come up with something more innovative than what I did but I've had a headache all day so of course nothing was cooperating!

Happy painting friends!

MoYou Londong Stamping Challenge: Fanta-sea

So yesterday's theme was fantasy but I didn't really have anything that spoke to me so I went with fanta-sea and decided to use some of my stamps from the Sailor Collection. (I also love a good play on words!)

I started with Rimmel Mint-licious and then did a gradient with that and China Glaze Turned Up Turquoise to give that very Caribbean Sea feel.


I then used two images from the MoYou Sailor Collection plate 07. For the waves, I used the Rimmel colour and white to give a bit of a contrast and then just used white for the fish.


I think this is really beautiful and I'm absolutely in love with the colours. It's a very subtle look.

I need to do something about that hangnail on my index finger though, lol.

Happy painting friends!

Thursday, 17 April 2014

The Great Egg Hunt

Well, it's time once again for a challenge! I loved participating in the Valentine's challenge back in Feb and was sad when I missed the St. Patrick's one in March. I couldn't resist signing up for the Easter one though.

Today's prompt is Easter Eggs. I had this great idea about doing a riff on Ukrainian Easter Eggs but I ran out of time so I came up with this.


I started with two coats of Color Club Evolution and then added all the details using my nail art pens.


I then used Sally Hansen Sugar Shimmer Sugar Cloud to give it a bit of a shimmer.


I don't know that I'm in love with this design. It's just alright for me. I wish I had more time and could have put out something a lot better. But hey ho, we still have 3 more days of the challenge!

Happy painting friends!


Thursday, 16 January 2014

Sea Dragon

One of the blogs I follow religiously, Wondrously Polished (click name for link), had an amazing design the other day and I knew right away that I wanted to do a version of it. The polishes I used for this look are Sally Hansen Triple Shine Sparkling Water (turquoise), Beautifully Disney Ocean Mist (green) and Essie Sexy Divide (purple).


I started with a black nail pen and drew in the rough shapes.


I then went in with the colours and a small paintbrush and painted in the various colours. When I finished that, I went back over the black lines with the nail pen.


Don't they look like scales?! I was going to go with mermaid but then someone at work said "sea dragon" and I was sold!

I love these colours together and was so sad to take it off. I had planned to wear it for a couple days but I got nail mail through that day and couldn't resist trying out my new colours.

Happy painting friends!

Tuesday, 14 January 2014

Triple Shine yo!

Sally Hansen has come out with a new line called Triple Shine. I picked one up over the Christmas break and I've been dying to try it out and see if it was worth the fuss. I grabbed Sparkling Water, a really pretty dark blue/turquoise shade. It goes on beautifully but does take a few coats to build up. I don't know if this is indicative of the brand but I really didn't mind. The formula is quite beautiful and dried quickly so it wasn't a pain. Here is is pre-cleanup:


This is with no top coat so it really does live up to it's shine claims!

I couldn't leave it at that though so I added a bit more of the bling.


Again, this is with no top coat. If I were going to wear this for reals I would have to top coat it to keep the jewels on but for the purposes of this post I wanted to show you it in it's natural form.


I like this polish and I'm tempted to buy more. I'll probably wait until I'm in the States again as it's probably a heck of a lot cheaper there! (I got it for $5 at Walmart in Canada.)

Hope you enjoyed!

Happy painting friends!

Friday, 10 January 2014

Pink Sand

Onward and upward with my new polishes! Today's look started with a base of Sinful Colors Cinderella. It's a beautiful light blue colour but it is very sheer so it took me four coats to get it opaque. I then added layers using an unnamed pink from Walmart's brand Twinkling Star.


I called this post Pink Sand because I think the pink polish looks like just that, sand that is pink. It reminds me of those decorations people have on their desk that's sand in a picture frame type thing and you tip it upside down and it forms shapes. Here's a link if you don't know what I'm talking about (I don't know that I'm being all that clear, lol.)

I decided it needed a bit of the old bling, so I added on a silver glitter (again from Walmart).


I think it's pretty. I'd like to try it in other colours.

Hope everyone has a good weekend!

Happy painting friends!

Sunday, 29 December 2013

How Many New Polishes?! (Zoya Dream Swatch)

My sis in law asked me today how many polishes I got for Christmas so I did a quick count and found I got 85 new polishes! Crazy! I think about 35 of them are minis but that's still a lot of polish. I ain't complaining though :)

It's going to take me awhile to get through all of these but I've already made a good crack at it and I'll be featuring some nail art with my new colours.

Today however is just a swatch of a new Zoya I got. (Santa was kind to me and got me 15 new Zoyas!)

This is Zoya Dream and it is an absolute dream!!


This is two coats and the formula is everything I have come to expect from Zoya. It goes on amazingly well and I think it looks like the late evening sky. It has such depth and is just amazingly pretty.


It's so gorgeous I didn't want to cover it! I imagine I will use this polish a lot in nail art though.

Happy painting friends!

Wednesday, 18 December 2013

Light Me Up

Living in an apartment is not very conducive to having outside lights. My husband has always had a fantasy of having a National Lampoon's type Christmas light display, lol. Since we can't have them where we live, I thought I would put them on my nails.


I started with a base of Essie Bikini So Teeny (one of my favourite light blues). I then went in with a whole load of nail pens and drew in the Christmas lights.


I then took Sally Hansen White On and sponged it at the base to look like snow (not sure how successful this was).

Here are some pics in natural light:


I got the inspiration from the look the Nailasaurus did here but I wanted to make it look more like the snow was on top of the lights. Unfortunately I was a bit too heavy handed and I think I covered up the lights a bit too much. Oops :)

Happy painting friends!

Thursday, 12 December 2013

Warm Up with a Cup of Cheer

I love getting inspiration from all over and today's nails are inspired by a picture of one of my friends, Nikki, who recently visited the German Christmas Market here in Vancouver. If you are ever so fortunate as to meet Nikki, you would find her to be one cool lady indeed!

Here is the pic I took inspiration from:


And here is the nail art that came from it:


I started with a base of Zoya Sailor  on all of my nails to replicate her coat and then added polka dots using a dotting pen and Revlon Foxy (dark brown) and an unnamed beige by LA Color Craze for a rather loose interpretation of the fur around her collar.


My first pic is in natural light and the second pic is taken indoors.


This pic is also in natural light. For the cup I used an unnamed red in my collection and some nail art pens for the details. I'm not sure what exactly is in the cup ;)

Nikki liked it a lot! (I think, lol)

Happy painting friends!

Wednesday, 4 December 2013

I'm Obsessed with Snow!

I know I've already posted two (maybe three) snow designs so far but what can I say? I love me some snow! I started with a base of Kleancolor Blue Pearl, a silver glitter topper and Orly White Out (for the snow on the ground). I then did the rest of the design with nail pens.


There is something about blue and silver that just says beautiful to me. I love it paired together with a snow motif.


It reminds me of a snow globe being shaken.


I am so in love with this design I can't even stand it! It makes me so happy :)

I'm really really enjoying doing this winter/Christmas themed nail art. Stay tuned for more!

Happy painting friends!

Monday, 2 December 2013

Let it Snow, Let it Snow, Let it Snow

My dear friend Kaycie was by again and of course I had to paint her nails for her! I told her just to trust me this time as usually I let her pick out her design and colours. I knew she wanted something festive so I put on the Christmas music and went to work. I started with a gradient base using Barry M Blue Moon and Barielle Sky's the Limit . Then I applied a layer of white glitter and then drew in some snowflakes with a white nail pen.


She loved it!

I also added in some little blue rhinestones to give it an extra bit of bling.


I was getting Kaycie to do all these different poses and then she wanted to do one of her own so here it is:


I love that she did it and then said, "Kablam!" She is too funny!

Happy painting friends!


Saturday, 30 November 2013

If you Like it Then You Should Have Put a Stripe on It

I saw this beautiful blue from China Glaze (Sparks Will Fly) in my stash the other day and knew I had to use it. It's a magnetic polish which means that you can put a magnet over the wet polish and it will form into a design (the magnet comes with the polish). I'm not a massive fan of using the magnet; I just love the colour of the polish! I wanted to keep it simple so I just did one coat of the China Glaze and then used a silver nail pen and put in a couple of stripes.


So simple but so effective! The silver lines did get a bit smushed in a couple places but that's only noticeable if you look really closely.


I love this colour as it is really heavily pigmented and goes on so easily. This whole look took me no time at all, yet I think it is stunning. I can see me wearing this in many different shades.

Happy painting friends!

Saturday, 23 November 2013

Zoya Days Part 2 , Sunshine

Here is my 2nd Zoya nail polish that I again really love! This one is a textured polish called Sunshine which is an interesting name for a blue polish. You would think that it would be a yellow with a name like that but it does feel bright and happy to me.


And here it is in the sun:


How beautiful is this?! Zoya says to use 2-3 thin coats but this baby went on in one coat! Gorgeous.

I had to do some nail art with it and I'm a little in love with this.


This is just some gold striping tape and a gold stud. Simple to do but super cool!


Did I mention that I love the Zoya polishes?! Stay tuned tomorrow for another stunner!

Happy painting friends!

Monday, 18 November 2013

Let the Snow Fly!

My hubby is getting extremely excited for the upcoming ski season (in fact Whistler had limited opening for skiing on Saturday and he was tempted to go!). He keeps checking the weather forecast to see if it's snowing on the mountains so I thought I would do some snowflake nail art to inspire the snow to fall.

I have never done snowflakes as I really only started doing nail art seriously this past summer so I wanted to try a different style of snowflake on each nail.


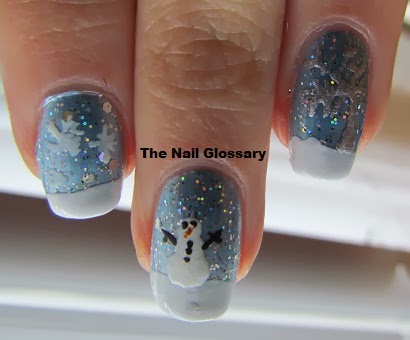
The base of this design is a dark smoky blue from L'Oreal called VIP Status. It has a beautiful silver shimmer undertone and it reminded me of a cold wintry night.


The snowflakes are done with just a basic white nail pen. I think that it would have worked well with a silver nail pen as well.


I took these photos at night so they are under artificial light. Not my favourite lighting but I had to work with what I had! Now that I'm a bit more mobile I'm going to be experimenting with my photos and lighting a bit more to find a good balance.

Here is each nail individually:


I think my least favourite is the middle finger; it's a bit messy for my taste. My favourite is probably the pinkie. I like how that one turned out.

Let it snow, let it snow, let it snow!

Happy painting friends!