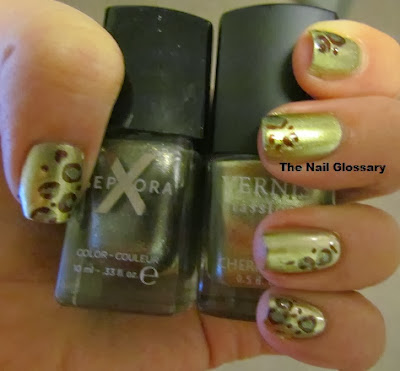
I got this beautiful green metallic colour by Cherimoya called, aptly enough, Green Metallic. It's such a pretty colour and I really wanted to do some nail art centered around it. I decided to make it the central colour and add just a little bit of colour to it so that it was the star of the show.
I added on leopard spots using Sephora X Perplexed and a mahogany nail pen.
I like the simplicity of this design.
You could jazz this one up if you added some rhinestones or some glitter accents. I wanted to keep it relatively plain though as I think the green metallic nail polish is jazzy enough!
Happy painting friends!
Showing posts with label Sephora X. Show all posts
Showing posts with label Sephora X. Show all posts
Wednesday, 20 November 2013
Friday, 15 November 2013
Tape it Off Baby! (tutorial)
It's time for a tutorial! I know it's been a long time since I've done one so I apologize for that but I've got a killer look for you today and all it requires is nail polish, scotch tape and patience!
Here is the finished look:
I then taped off random sections and painted on L'Oreal Boozy Brunch (orange), Sephora X Control Freak (maroon) and OPI Magazine Cover Mouse (textured red).
Here is a step by step breakdown of how I achieved the look:
Step 1: after prepping your nail (I usually use a cuticle oil and then a base coat) paint on your first colour. In this example I am using Essie Good as Gold. Then comes the hardest part; you need to wait for it to dry really well! If you go on to the next part to soon, you will pull up your base coat and will need to start again.
Step 2: using scotch tape, section off a part of your nail. Make sure the tape is really stuck down so you don't get bleeding under the tape.
Step 3: use your second colour (I used China Glaze Turned up Turquoise) and paint over your nail. No need to paint in the lines as that is what the tape is for.
Step 4: remove the scotch tape. As you can see I was a little eager and applied the tape too soon and got some damage on the tip. If I was doing this for real I would have redone it but I'm glad I can show you and you can learn from my mistake, lol.
Step 5: the same as Step 2. It's so important to make sure your polish is fully dry before you apply the tape. If you want to speed the process up, you can add a fast drying topcoat before putting the tape on.
Step 6: paint on your next colour.
Steps 7-9: repeating steps 4-6 (I used a green glitter from Color Club for my last colour).
Once you've finished all your sections you can top it off with a top coat and Blam! you have some beautiful and easy nail art. The most important part is just being patient and allowing your polish to dry before going on to the next step.
As you can see from my first pics, no two nails are the same. It's a really versatile design so just have fun with it!
Happy painting friends!
Here is the finished look:
For this look I used Vernis classique by Cherimoya Light Red and two coats of L'Oreal Satin Sheets to get a kind of rose gold colour for the base.
Here is a step by step breakdown of how I achieved the look:
Step 1: after prepping your nail (I usually use a cuticle oil and then a base coat) paint on your first colour. In this example I am using Essie Good as Gold. Then comes the hardest part; you need to wait for it to dry really well! If you go on to the next part to soon, you will pull up your base coat and will need to start again.
Step 2: using scotch tape, section off a part of your nail. Make sure the tape is really stuck down so you don't get bleeding under the tape.
Step 3: use your second colour (I used China Glaze Turned up Turquoise) and paint over your nail. No need to paint in the lines as that is what the tape is for.
Step 4: remove the scotch tape. As you can see I was a little eager and applied the tape too soon and got some damage on the tip. If I was doing this for real I would have redone it but I'm glad I can show you and you can learn from my mistake, lol.
Step 5: the same as Step 2. It's so important to make sure your polish is fully dry before you apply the tape. If you want to speed the process up, you can add a fast drying topcoat before putting the tape on.
Step 6: paint on your next colour.
Steps 7-9: repeating steps 4-6 (I used a green glitter from Color Club for my last colour).
Once you've finished all your sections you can top it off with a top coat and Blam! you have some beautiful and easy nail art. The most important part is just being patient and allowing your polish to dry before going on to the next step.
As you can see from my first pics, no two nails are the same. It's a really versatile design so just have fun with it!
Happy painting friends!
Subscribe to:
Posts (Atom)


