Well it's official, I'm in love with
Zoya nail polish. I've wanted to get some
Zoyas for awhile now but they aren't sold in stores and even thought the reviews had been really good I usually like to try out a polish before buying it. There was a huge sale online however and so I picked up 6 polishes. It only took the first polish to know I was hooked! Over the next several days I'm going to feature a different polish each day with some nail art.
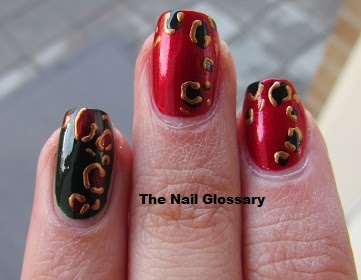
Today's polish is the first one I grabbed,
Zoya Delilah. It is an absolutely beautiful red with a gorgeous glitter.
This is two coats with one coat of
Seche Vite top coat. I couldn't stop looking at it! It reminds me of Dorothy's ruby slippers from The Wizard of Oz.
I wish I had taken a pic of this in the sunshine so you could see it in all its sparkly glory!
With every
Zoya polish I'm going to feature, I also want to add some nail art. I thought some black roses would look very classy with this polish.
I used one of my black nail pens to draw in the rosettes.
I did not want to take this polish off! It's just so pretty; definitely something I will be using a lot in the future.
Stay tuned tomorrow for the next
Zoya polish!
Happy painting friends!