Search This Blog

Showing posts with label green. Show all posts

Wednesday, 30 April 2014

Neon Leopard

Along with my cool new nail plates my MIL also brought me some new Barry M polishes. I really like Barry M but they aren't available in Canada (at least not on the west coast). She got me nine polishes and I'm featuring two of them here Key Lime and Mango.


I started with a base of Mango on all nails except the ring finger which has Key Lime. I then blobbed on the alternate colour in different sizes for the start of the leopard print. I then used my black nail art pen to add the accents to the leopard print.


I love love love how this turned out! It's so bright and fun. Maybe not entirely office appropriate but definitely cool for a fun night out.

Happy painting friends!

Sunday, 23 February 2014

Where Have I Been?!

I haven't posted for well over a week which is really strange for me but I'm trying new things. Last week I signed up for an Instagram account and I've been trying to post on there this past week. If you aren't following me on Instagram you can find me under thenailglossary.

But don't worry! I haven't given up blogging. I just wanted to try something new and going forward I'm sure I'll do both. Here's what I have for you today:


These are two colours by Butter London. The base colour is called Slapper and the middle stripe is called Knackered. I got these two minis for $10!


I then did an accent stripe of different coloured green and silver rhinestones.

Knackered and Slapper
I love Butter London's funny British names. It makes me remember my time living in England and smile. And I love these colours! So much fun.

As I write this it is snowing pretty hard! What happened to our sun?! Bring on the spring!

Happy painting friends!

Wednesday, 22 January 2014

St. George Vs. Dragon

I love a england polishes! I got four new ones in my nail mail the other day and I wish I had ordered more. I knew I wanted to get a bunch after seeing them so many times on other blogs but I didn't realize quite how amazing they'd be in person. I don't think photos do these polishes justice! I got St. George (dark green) and Dragon (light green) for the purpose of doing a gradient. I saw this on another blog and I wish I could remember which one!


I can't even express to you how gorgeous this polish is. Dragon went on beautifully in one coat and I know St. George does the same.


Dragon
I wish I could capture the full extent of their beauty. Love, love, love! I'm sure these will be in high rotation.

Happy painting friends!

Thursday, 16 January 2014

Sea Dragon

One of the blogs I follow religiously, Wondrously Polished (click name for link), had an amazing design the other day and I knew right away that I wanted to do a version of it. The polishes I used for this look are Sally Hansen Triple Shine Sparkling Water (turquoise), Beautifully Disney Ocean Mist (green) and Essie Sexy Divide (purple).


I started with a black nail pen and drew in the rough shapes.


I then went in with the colours and a small paintbrush and painted in the various colours. When I finished that, I went back over the black lines with the nail pen.


Don't they look like scales?! I was going to go with mermaid but then someone at work said "sea dragon" and I was sold!

I love these colours together and was so sad to take it off. I had planned to wear it for a couple days but I got nail mail through that day and couldn't resist trying out my new colours.

Happy painting friends!

Saturday, 21 December 2013

Christmas Glitter Polka Dots

I wanted to do something a bit glam for the season and since I've been trying to do both hands (as only one hand done is weird when you're in public) I needed something that was reasonably easy. Dotting is a beautiful pattern and rather easy to do on both hands.


I started with a base of Sally Hansen Diamonds which is a beautiful gold shimmer. I then went in with my dotting tools and did various sizes of Zoya Delilah (red), Tomoko (gold) and an unnamed Color Club green.


These pictures are of my ever elusive right hand! Let me tell you how hard it is to take pictures using your left hand. I need to practice apparently.

Happy painting friends!

Friday, 20 December 2013

Putting Presents Under the Tree

Of course I needed to do some presents! Christmas for me is all about family but I must admit that I do get excited about all those fancy wrapped packages under the tree :)


I started with a base of Sephora by OPI Curve-aceous (gotta love that red!) and then added in all the accents (bows, ribbon, tree, star) using nail pens.


I think these are pretty but I don't know that they are super "original" and they are very plain compared to what my mom does with her wrapping.

Next year when I do present nail art I will have to make them all different.

Happy painting friends!

Monday, 16 December 2013

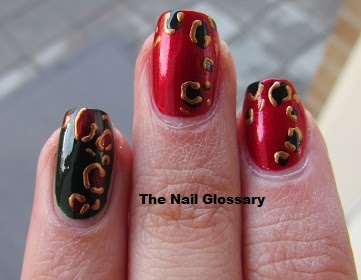
Christmas Leopard

I love me some leopard and so of course I had to do some Christmas themed ones! I stared with a base of Sephora by OPI Curve-aceous (red) and Nails Inc. Bruton Mews on the accent nail.


I then dabbed on the opposite colour for the leopard spots. The above picture is taken in front of my Christmas tree :)


I then used a copper nail pen and outlined the spots.

Here are some pics outdoors:


This may be one of my favourite leopards! I love how versatile animal prints are. I think this would look good with a gold stud at the base of the nail.

Happy painting friends!

Wednesday, 11 December 2013

A Little Bit Holly

Being back at work has sure made me behind in blogging! I have definitely not been on top of it like I usually am but I still haven't missed a day! I wanted to do some nail art for my friend Holly and what better to do than some holly :)


I started with a base of Orly Moonlit Madness (red) and then did a diagonal stripe of Zoya Tomoko (gold). I then took the Orly and dotted on the berries followed by putting the leaves and gold accents on with nail pens.


I really like how these turned out but they weren't what I pictured in my mind lol. Isn't that always the way?


Apparently I applied the top coat (Seche Vite) rather poorly as I had uneven lines near the cuticle. Oh well, it's a learning process!

Happy painting friends!

Friday, 6 December 2013

What Says Christmas More than Green and Red?

Today I have used China Glaze Outta Bounds and OPI Magazine Cover Mouse to do a stripe design. I was going to incorporate some gold as well but it didn't really work out.


I think it's such a Christmas combination! It reminds me of gift wrap.


The only thing I wish is that my lines were a bit more even; it would make the look cleaner. But overall I think this is a simple (ish) Christmas design. I like the contrast of the shiny green and textured red as well.

Happy painting friends!

Sunday, 1 December 2013

Tis the Season!

It's December and you know what that means...Christmas nail art is upon us! I'm not saying that I'm going to do holiday themed nail art every day but I'm also not promising that I won't. Christmas is my favourite time of the year and I'm so excited to do some cool designs. I'm pretty pumped about today's look. I saw something similar to this on a blog and for the life of me I can't remember which one (wish I could so I could give credit where credit is due!).


I used a base of Zoya Tomoko (which you know I love!) and then drew on the holly leaves with a green nail pen and the berries with Orly Moonlit Madness and a dotting tool.


I think this turned out so well! The holly is pretty simple design-wise but I think it looks amazing when paired with the gold textured polish. So festive!!!!


I absolutely did not want to take this off of my fingers!

Happy painting friends!

Wednesday, 20 November 2013

If a Leopard and Green Metal had a Baby

I got this beautiful green metallic colour by Cherimoya called, aptly enough, Green Metallic. It's such a pretty colour and I really wanted to do some nail art centered around it. I decided to make it the central colour and add just a little bit of colour to it so that it was the star of the show.


I added on leopard spots using Sephora X Perplexed and a mahogany nail pen.


I like the simplicity of this design.


You could jazz this one up if you added some rhinestones or some glitter accents. I wanted to keep it relatively plain though as I think the green metallic nail polish is jazzy enough!

Happy painting friends!

Wednesday, 13 November 2013

Black Cherries

I have a polish from Vernis classique by Cherimoya called Angel's Rave (awesome name, right?) that I've been dying to use. It's a black base with silver and red glitters. It's so pretty! I applied it and it immediately made me think of cherries. I have absolutely no idea why it did but I was compelled to make it happen:


I think this is so cute! I wish you could see the glitter in the base a bit more because it's so gorgeous.


I also love this base for a galaxy mani and think that I will have to do one soon with this. The only thing I'd say is that I wore this over night and I had tip damage by the next day so be sure to wrap your tips!!

Happy painting friends!

Friday, 8 November 2013

Nimbus

I get a lot of my ideas from other bloggers and always try to give credit where credit is due. This one comes from one of my favourite bloggers The Nailasaurus. She comes up with great ideas all the time and I can only hope to have work that is as clean as hers one day. This is a technique she calls Nimbus and is done using a cotton swab, acetone and polish. There is a great tutorial on her website here.


I started with a base coat of Orly White Out and then used the Nailasaurus' technique to dab on my other colours which were Barry M Greenberry, Color Club Wild Cactus (dark green), and Color Club Sugar Sheer (pink).


I really love this look and I think it's something that is easy to do on both hands. The other great thing about this is that it lends itself to so many different colour palettes. I'll probably try it in warmer shades soon.


I still need to figure out my camera skills because the colours were a lot more saturated in real life.

Hope you've enjoyed :)

Happy painting friends!

Monday, 4 November 2013

It's a Mickey Birthday Party!

Today is my dear mother-in-law's 60th birthday! I wanted to celebrate by doing some nail art for her since I can't be physically with her (for those of you who don't know she lives in England). When I think of my mother-in-law I think of bright happy colours and Disney, lol. My husband's family, like me, are Disney fanatics so I really wanted to incorporate the Mouse into the design.


Here's my Mickey Mouse birthday party nail art. On each nail there is a different base colour (listed later in the post), some polka dots, Mickey heads (some with birthday hats), and then random other dots and streamers.


I think this design is really fun and pretty much what I was going for. My mother-in-law is an extremely vibrant person and that is reflected in the design.


I hope she enjoys the design and has a fantastic birthday!

I used one coat of Sally Hansen White On for all my fingers (to make the next colour pop) and then painted on the colours as follows to form the base:

Thumb=Joe Fresh Lime Juice (green)
Index=Orly Mayhem Mentality (orange)
Middle=Orly Harmonious Mess (purple)
Ring=Orly Choreographed Chaos (pink)
Pinkie=Orly Pretty Ugly (blue)

(Mickey heads, birthday hats, dots and streamers were done with nail pens)

Happy painting friends!